Load Testing with k6 on Azure Container Instances
Contents
This is a post in the Load Testing on ACIs series.
Other posts in this series:
- 2020-05-07 - Load Testing with k6 on Azure Container Instances
- 2020-05-21 - Custom k6 Load Tests in Containers
In this very first post let’s explore how to run the k6 load testing tool easily and on demand on Azure Container Instances (ACIs).
Load testing is a type of performance testing where we simulate a specific workload (concurrent users accessing the system) and observe the system’s behaviour under this load.
You might already have your favourite tool for the job that you run locally or on a dedicated server from the command line. Maybe you have found it nicely packaged up on Docker Hub, pulled it to your computer and ran it that way… and started wondering how to do the same in the cloud!
Containers in the cloud
There are many options to run docker containers on Azure, but one of the easiest and (potentially) most cost-effective ways is with Azure Container Instances.
This serverless offering is perfect for short-lived processes running in containers because you can start and stop them on demand. Since the pricing model is consumption-based, you only pay for the duration whilst the containers are up and running.
The underlying infrastructure and servers are managed for you by the cloud provider, so there’s no need to provision virtual machines or set up complex orchestration.
You can also pull the container images from different sources. ACIs support public or private images from Docker Hub (or other registries) and private images from Azure Container Registry (ACR).
Introducing k6
k6 is an open source load testing tool by Load Impact, written in Go and scriptable in JavaScript.
k6 is a developer-centric, free and open-source load testing tool built for making performance testing a productive and enjoyable experience.
Using k6, you’ll be able to catch performance regression and problems earlier, allowing you to build resilient systems and robust applications.1
The team are shipping it through different channels including Docker containers which are publicly available on Docker Hub .
Hopefully you have docker installed locally, so you can follow along, but if not, don’t worry, we are moving all of this to the cloud very soon 😉
Let’s start with pulling the latest image first from Docker Hub:
|
|
We are going to use a very basic example from k6’s documentation with a minor tweak.
|
|
Let me break this down:
- Virtual Users (VUs) which is basically the number of parallel execution threads
- Duration is the time limit of the test with constant load but there are more advanced scenarios (eg. stages with ramp up)
- Finally, there is the test script (JavaScript file) which is from the team’s samples that basically calls their test API
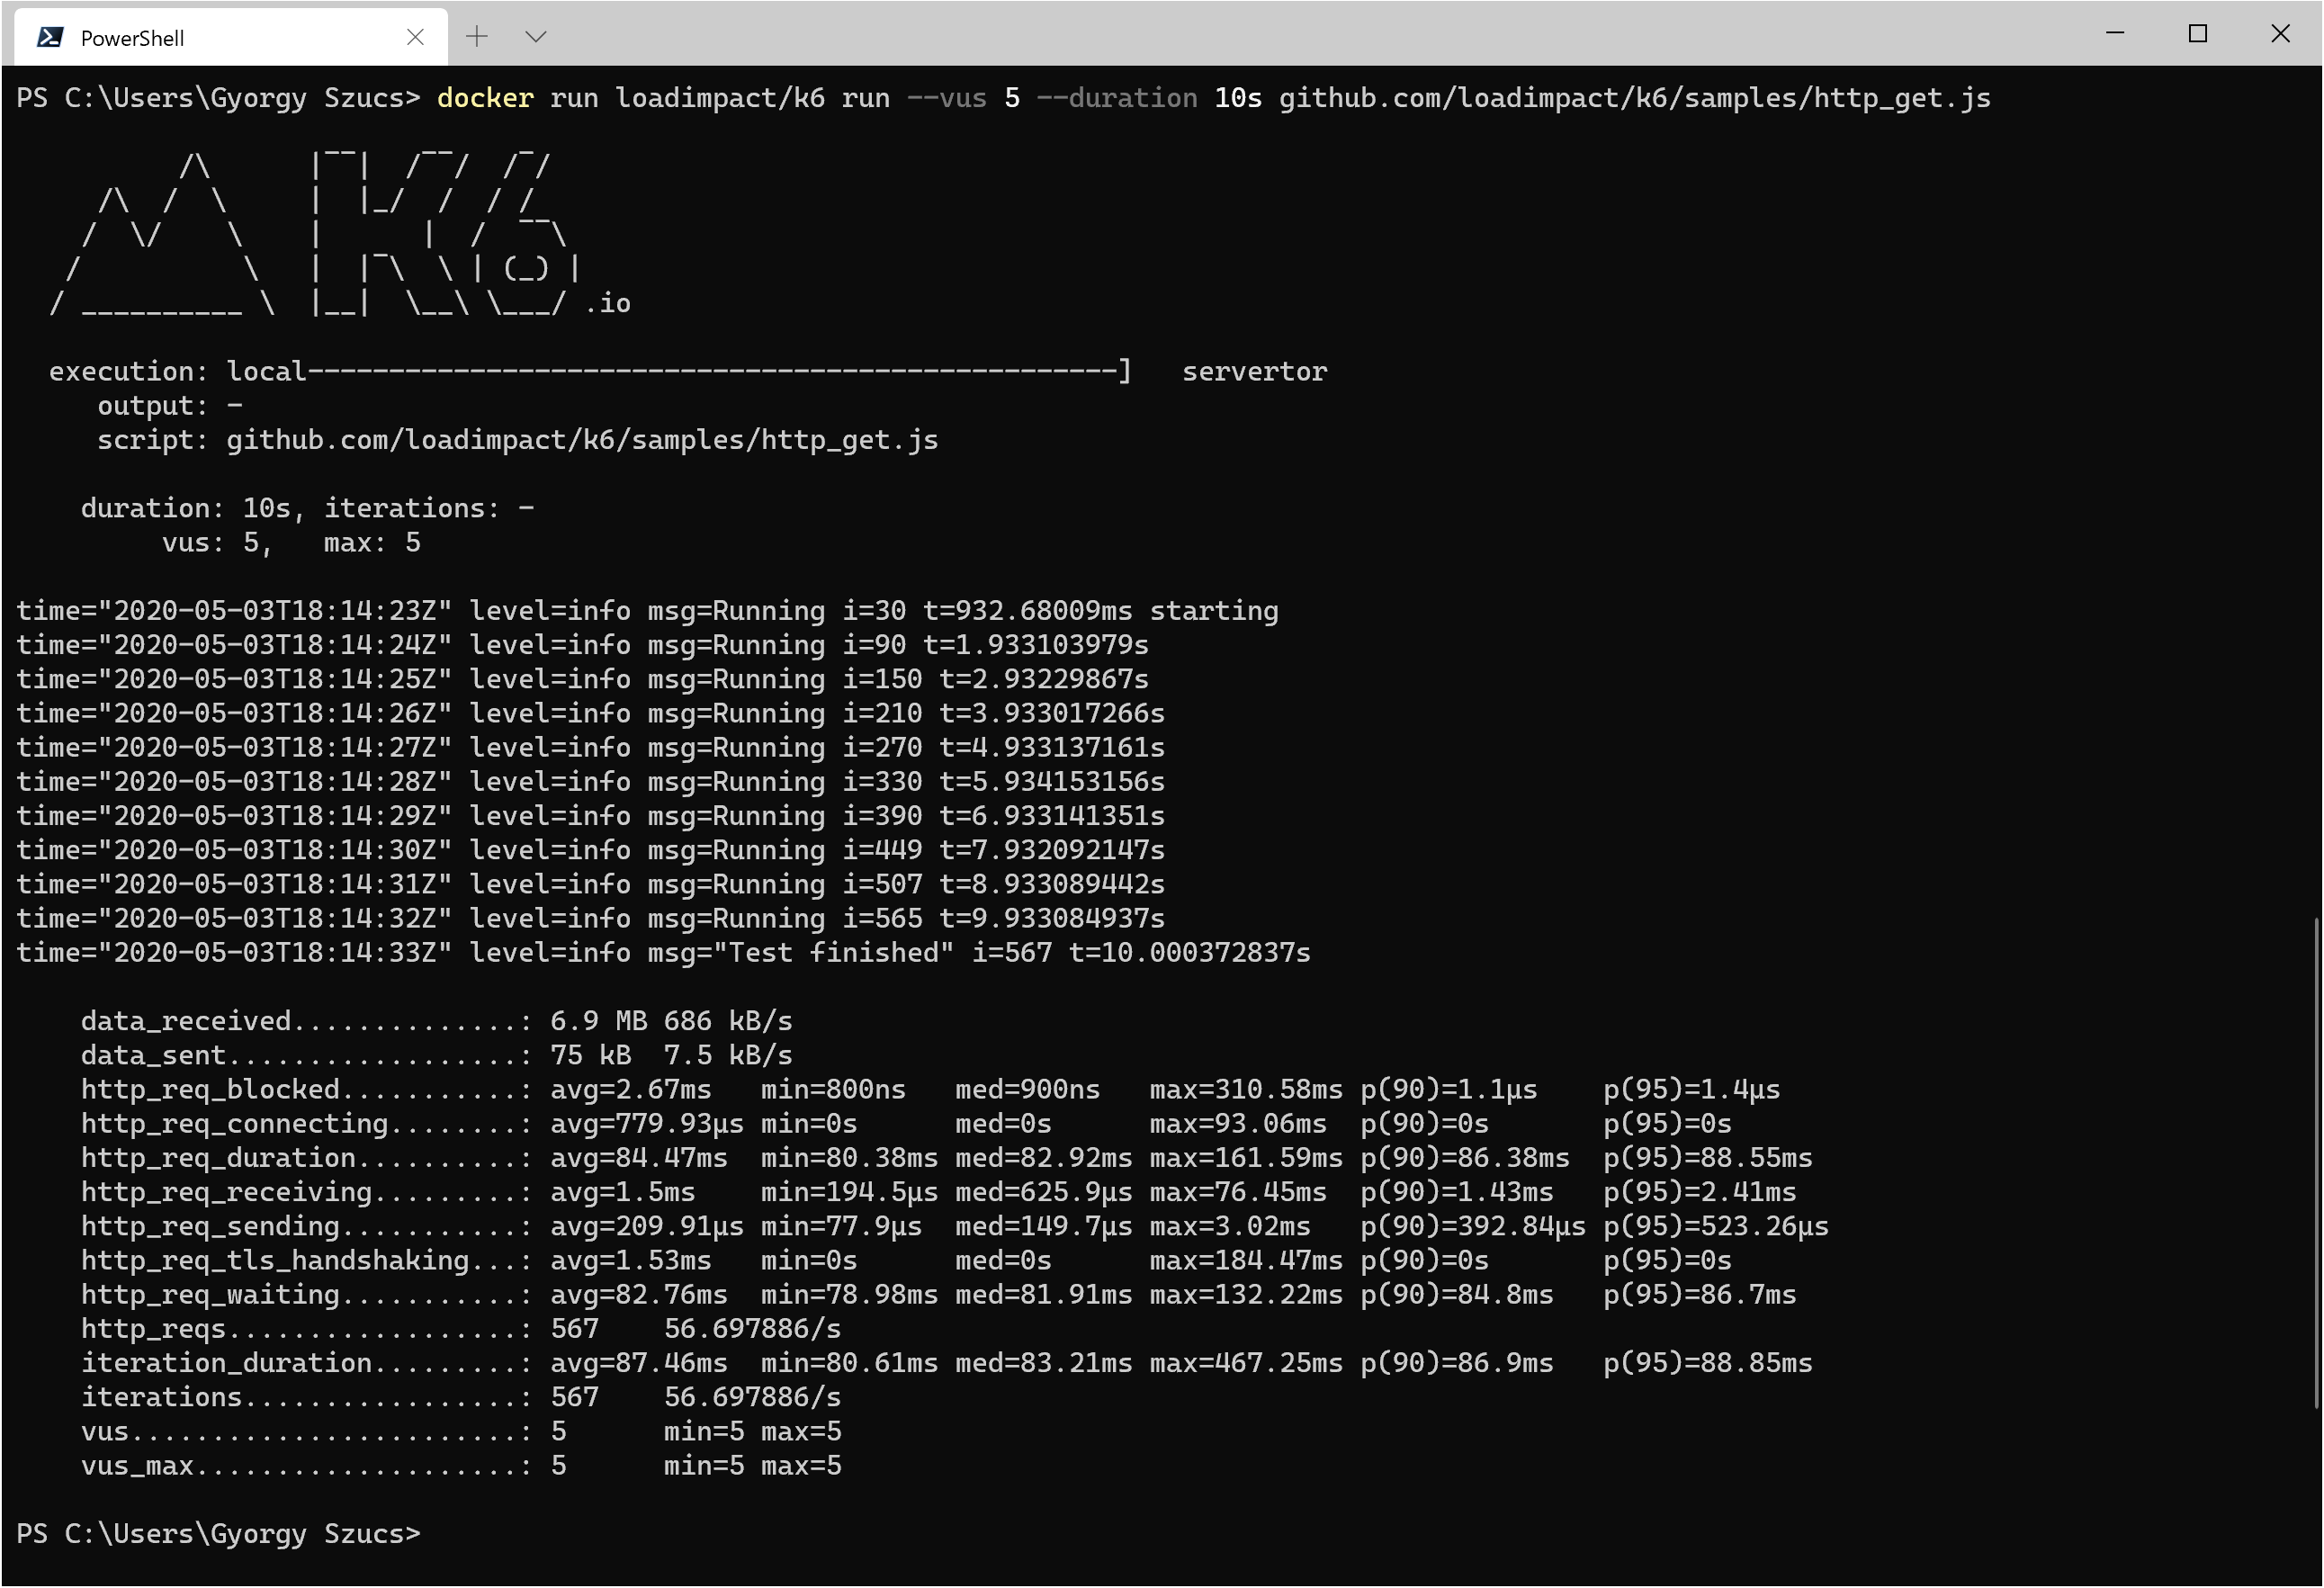
k6 output
After running the commands above, you’ll see the test results, whose interpretation is outside of this article’s scope, but I promise it will come up later.
Moving to the cloud ☁️
In the previous example you managed to load test an API with a few requests.
Having it run locally is great, but not ideal. You might want this test to be part of your deployment pipeline, or just scheduled to run every day at a specific time. Achieving this you might want to opt in for something more reliable and available than your PC - no offense.
The deployment process
- Navigate to Azure portal, create a new Resource Group for testing
- Add a new Container Instances resource:
- On the Basics tab, make sure the following parameters are set:
- Source: Docker Hub or other registries
- Image type: Public
- Image: loadimpact/k6
- OS type: Linux
- Size: 1 vcpu, 1.5 GiB memory, 0 gpus
- Click Next: Networking then Next: Advanced
- On the Advanced tab, set these values:
- Restart policy: Never
- Command override:
["k6", "run", "github.com/loadimpact/k6/samples/http_get.js"]
- Click on Review + create then Create
- On the Basics tab, make sure the following parameters are set:
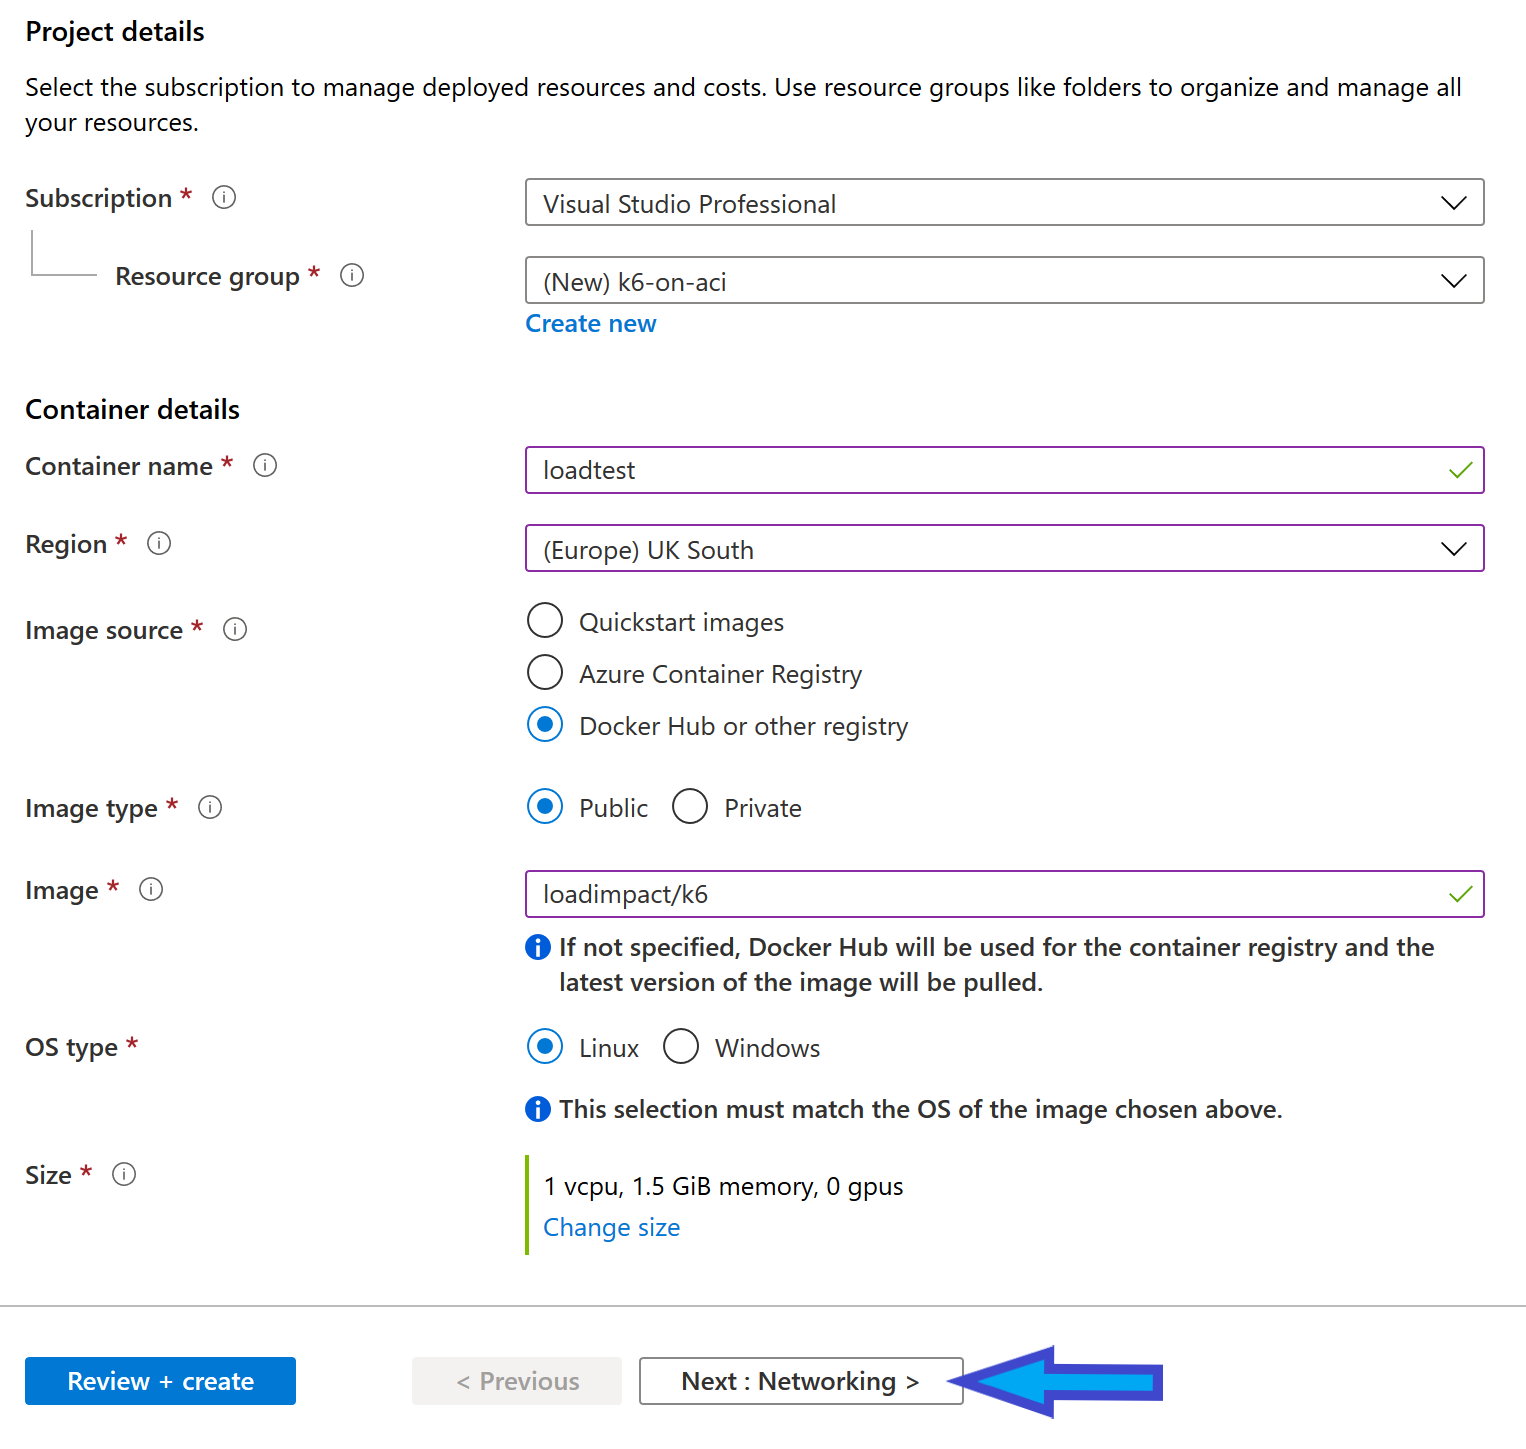
Azure Portal - ACI 'Basics' tab
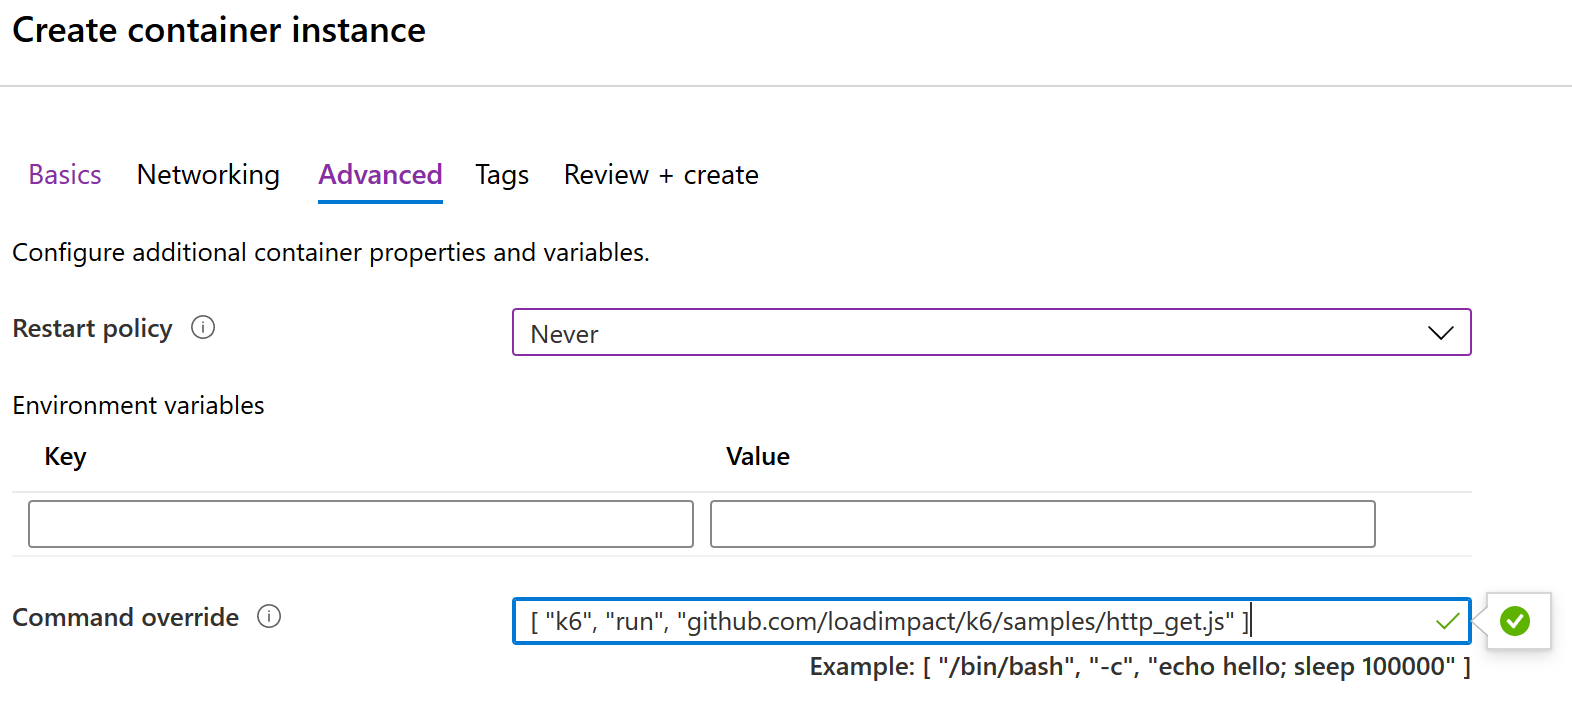
Azure Portal - ACI 'Advanced' tab
With the steps above, we are instructing the Azure Resource Manager to provision an ACI with the k6 image from Docker Hub, and we override the container’s start up script. This is needed because otherwise it would be just the same as doing this locally:
|
|
You would get help about the command, but that’s not so useful.
The command override mimics a similar behaviour as the local docker run example in the previous section but without the parallel users or multiple executions (no duration specified).
Checking the results
After the ACI gets deployed, navigate to the resource. On the Overview page, you’ll see some metrics about CPU and memory usage and also network traffic.
If you navigate to the Containers menu, you can see 1 container with the loadimpact/k6 image, most likely in a Terminated state with an event log below indicating that your Container Instance already pulled the image, started it up and finished execution.
Let’s switch over to the Logs tab, and this should be familiar already. k6 ran one iteration only with the sample script against their Test API.
Container Instances next steps
You have an ACI, which has run already and produced some output (logs). This container can be started again and again on demand from the portal or using the Azure CLI.
You can use the Cloud Shell (bash) from the Azure portal as well to create the ACI resource within a resource group, and interact with it. Let’s take a look at how to achieve the same results, but this time from the CLI.
|
|
Top tip
If you wanted to automate the ACI creation (eg. as part of a release script), add --no-wait to the create command, so it’s not blocking and waiting synchronously until the resource gets created.
Conclusion
We have really just scratched the surface here (both with k6 and ACIs), but in the near future we will see how to:
- run your custom load test so you can actually hit your servers
- view your logs in one place and create alerts
- integrate the solution to your deployment pipeline
Hopefully this article managed to show the simplicity and power of Azure Container Instances. According to the official docs about pricing , if you were running a small container (like the one we created) for 5 minutes every day, you would end up paying £0.01 at the end of the month. 1p, that’s it!