Custom k6 Load Tests in Containers
Contents
This is a post in the Load Testing on ACIs series.
Other posts in this series:
- 2020-05-07 - Load Testing with k6 on Azure Container Instances
- 2020-05-21 - Custom k6 Load Tests in Containers
After covering the basics about k6 and ACIs, we still haven’t run our own tests. We saw that k6 can grab a JavaScript load test file from the web, and initiate requests to the endpoint(s) specified there. It means we can do the same and host a test file ourselves in our GitHub repo or anywhere else where it’s publicly accessible!
Before doing that though… Let’s see how to write these tests.
A brief anatomy of the k6 test scripts
The basic test provided by the team is only a few lines. This is the file we were using for the load tests in our Container Instance.
|
|
The code inside this default function is called in every iteration of the Virtual User’s interaction with the system - this part of the script is also called VU code. You would generally imitate users’ actions here, eg. running an end-to-end user workflow via making HTTP calls, from performing authentication to other functional tests of your system.
Everything else in the script is called only once - that’s the init code. This is a great place to load a file from disk into memory that you can use from the default function.
You can also define options for the test runner, eg.
- number of Virtual Users and test duration, like we did previously via the
--vus 10 --duration 5scommand line parameters, or stagesfor ramping up/down behaviour - gradually increasing or decreasing number of VUs for a specific amount of time
Testing using a public script
It’s time to finally hammer our environment now. I’ve decided to test my blog’s response time (and status) with a few hundred users ramping up after a new post has been shared on social media - ambitious, isn’t it? I mean not for the Azure infrastructure, but the blog… anyways, back to testing.
Test script
|
|
The script above simulates an increasing load on the server for the first 30 seconds that’s easing a bit later on. Each user navigates to the new post, then back to the main page, then a new user arrives and does the same as long as the max number of VUs are not exceeded in the stage (where this number is dynamically changing every second). Our users are nice though, trying not to overload the system and wait 5 seconds between page changes.
Setting it up on Azure
In the first part of the series we saw how to set up the k6 test on Azure Container Instances. This scenario will be pretty much identical - except the URL of the test script we pass as a parameter.
- Save test file on GitHub/public storage
-
Create Container Instance
- ⚠️ Make sure you are pointing to your uploaded file in the command override ⚠️
- eg.:
["k6", "run", "https://gyorgy.dev/files/test.js"]
- Check the logs of the ACI
- Celebrate, you’ve just load tested your own website/API 🎉
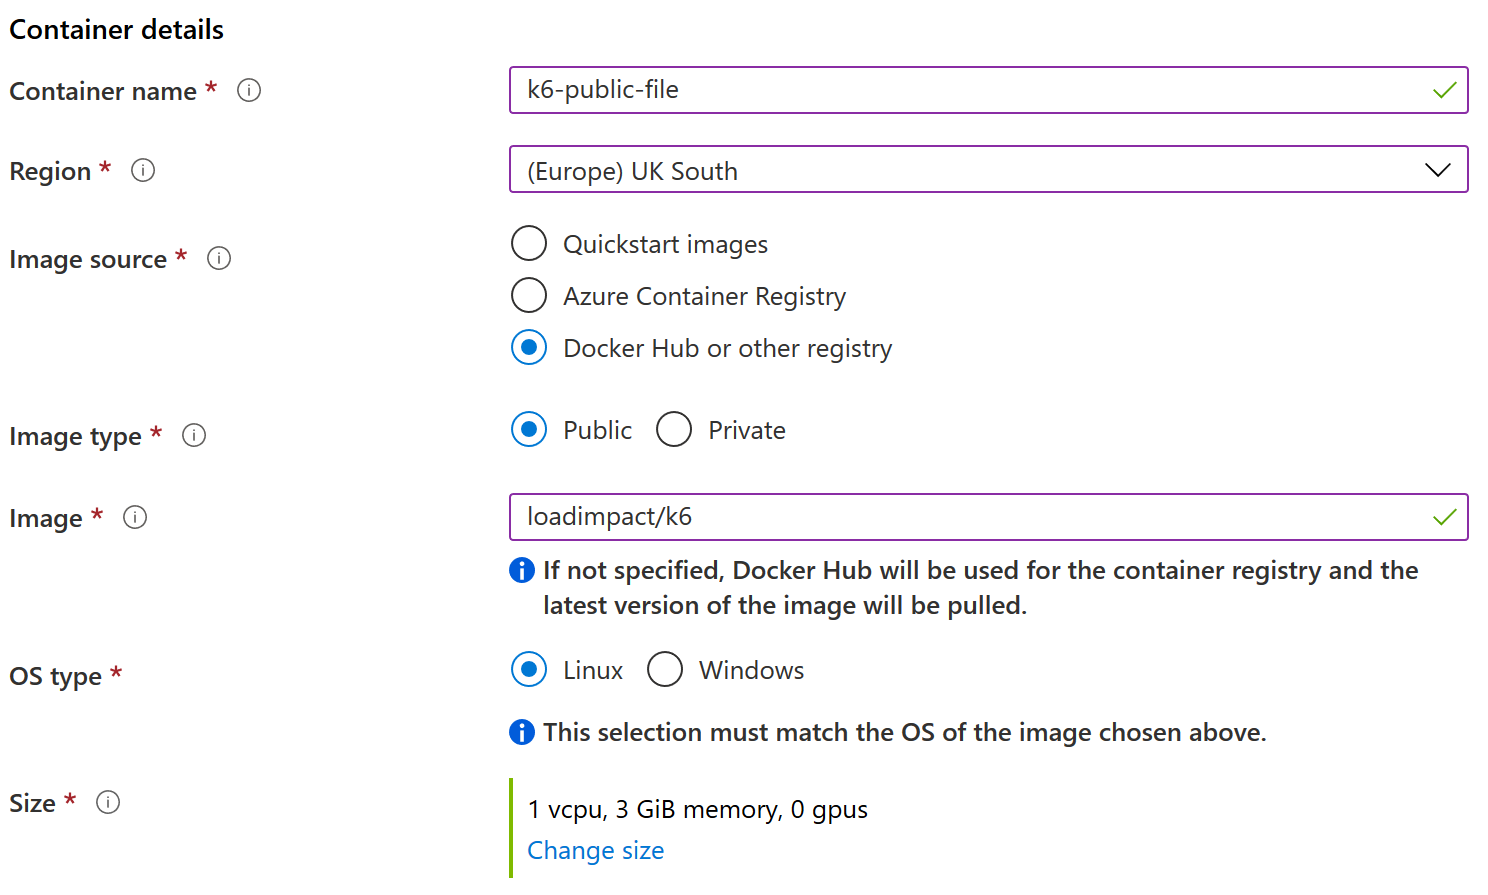
ACI Setup on Azure for Custom k6 Test - Basics tab
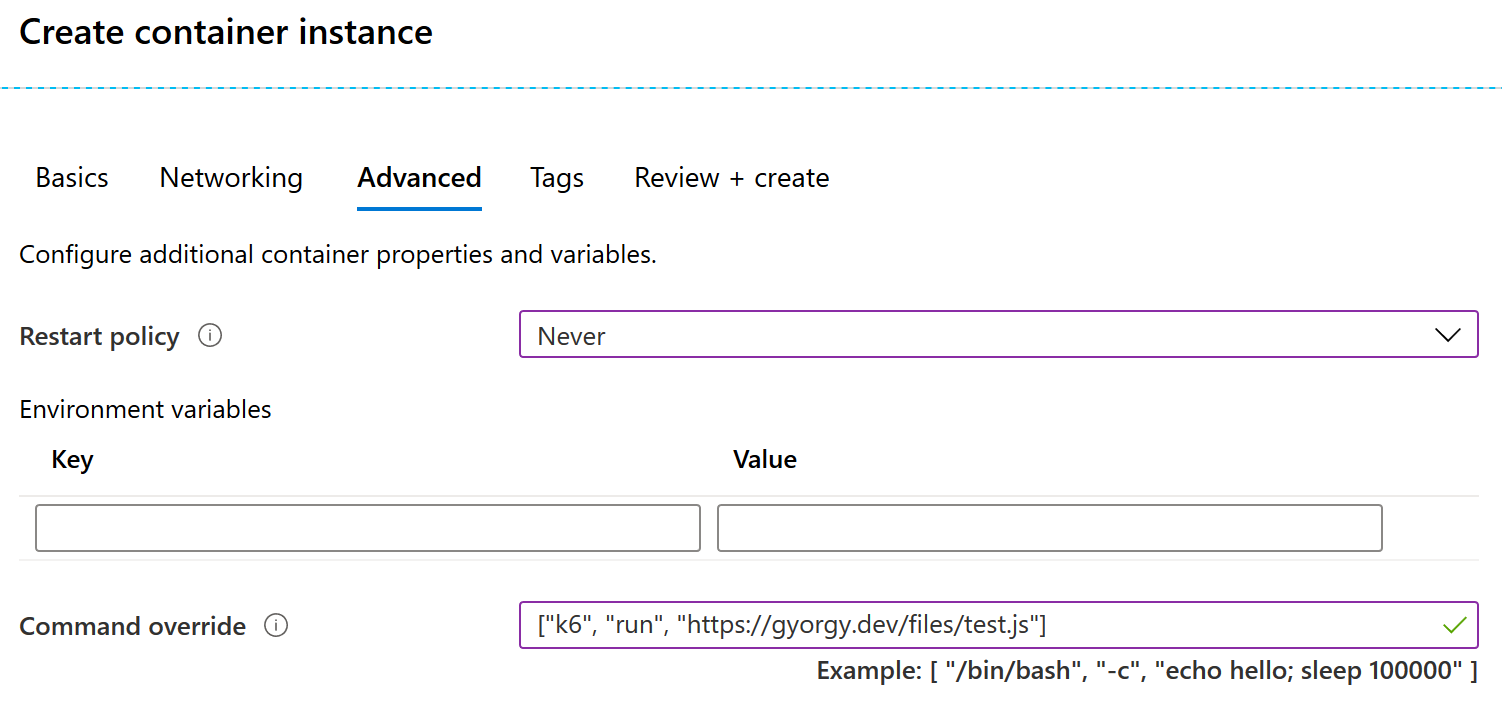
ACI Setup on Azure for Custom k6 Test - Advanced tab
Tip
If you are experiencing issues with checking your ACI logs, or the instance goes into Repairing or Failed state, you might need to create a new instance with more memory. In my example, I had to change the default 1.5GB memory to 3GB, and had no issues.
Understanding the output
We’ve run a few load tests already but never really looked at the output of them. Let’s see the three most important sections of them first:
- This section shows the iteration count (VUs finished their job) every second so you know how it changed during the ramp up or down stages
- The assertions made from the test script
- Each assert is evaluated for every iteration (virtual user interaction with the system)
- Failed ones have a breakdown to see how many times they failed
- Statistics of the requests made:
- data sent and received
- total duration of the request:
- minimum and maximum timings
- mean (average) and median values
- 90 and 95 percentiles - ‘most-of-the-time’ cases, ie. 90% / 95% of the requests finished within this time
- the same statistics for each stage of the request
- total and avg. (per second) number of HTTP requests made and (completed) iterations
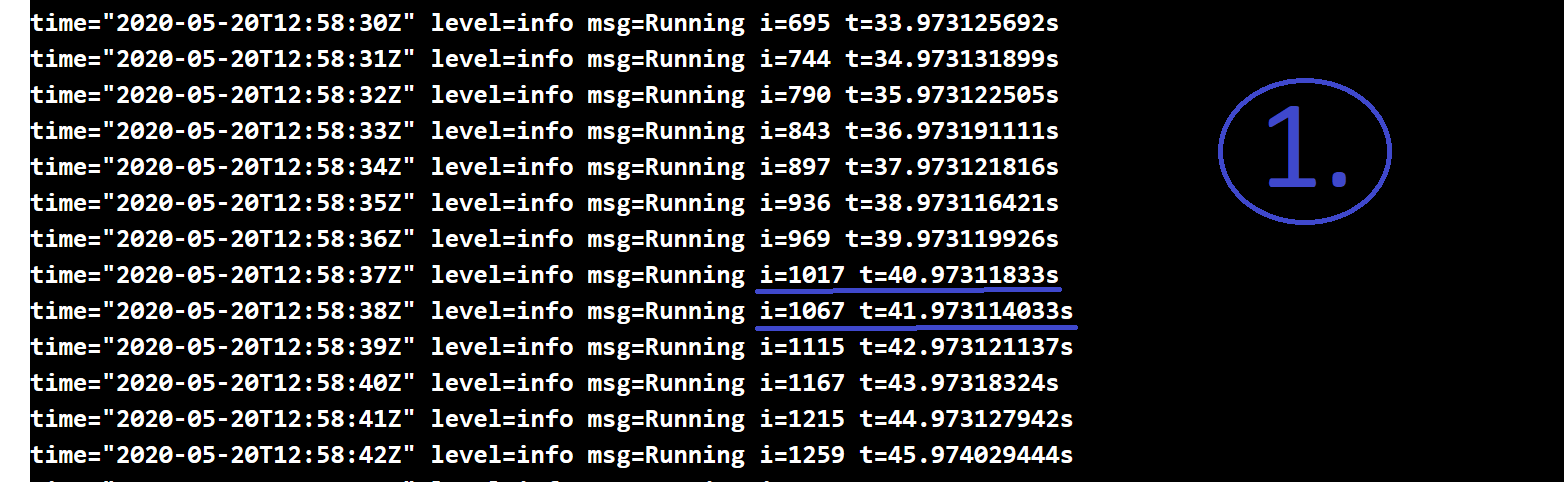
Understanding k6 Logs - iterations
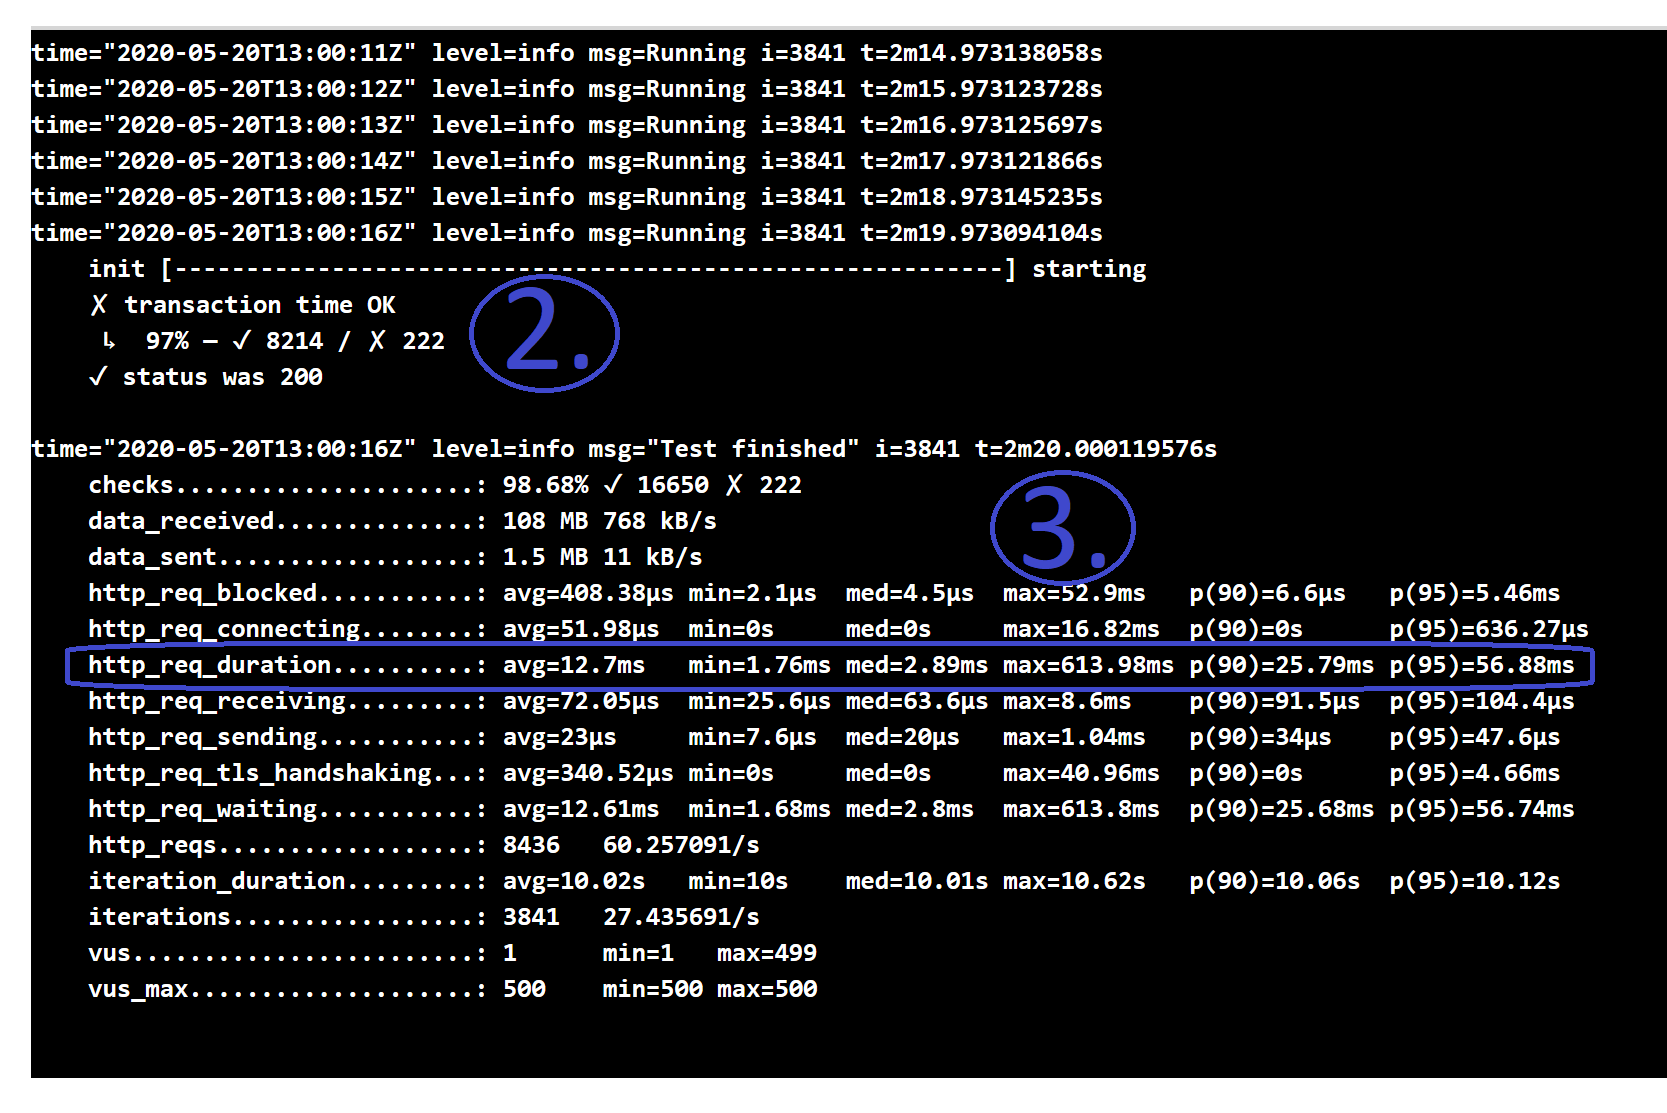
Understanding k6 Logs - asserts and stats
In this specific case, 97% of the requests successfully returned within 100ms (see the Test script above), and the worst time was ~600ms, but eventually every request was an HTTP 200 OK.
Problems? Maybe (not)…
The potential problem with this approach is obviously that it’s public. You might be working in private repositories on top-secret projects and you don’t want to expose your testing strategy to the whole world. So, how can we do better if it doesn’t fit your situation?
Custom container images ('the easy way')
We saw in the previous post that we can use the pre-built image from loadimpact and pass in the test file URL.
Nothing stops us from creating our own container image which has the test file packaged up with the k6 executables!
The Dockerfile, local image
The Dockerfile is extremely simple:
|
|
In this example:
- our image is based on the official k6 image from Docker Hub
- we copy our test.js script from the host machine to the container
- instruct Docker what command to run on startup. This
ENTRYPOINTcommand is very similar to the one we set during the ACI resource creation, right?
Now let’s build our image and run it locally (after making sure the test.js file is in the same folder as the Dockerfile).
|
|
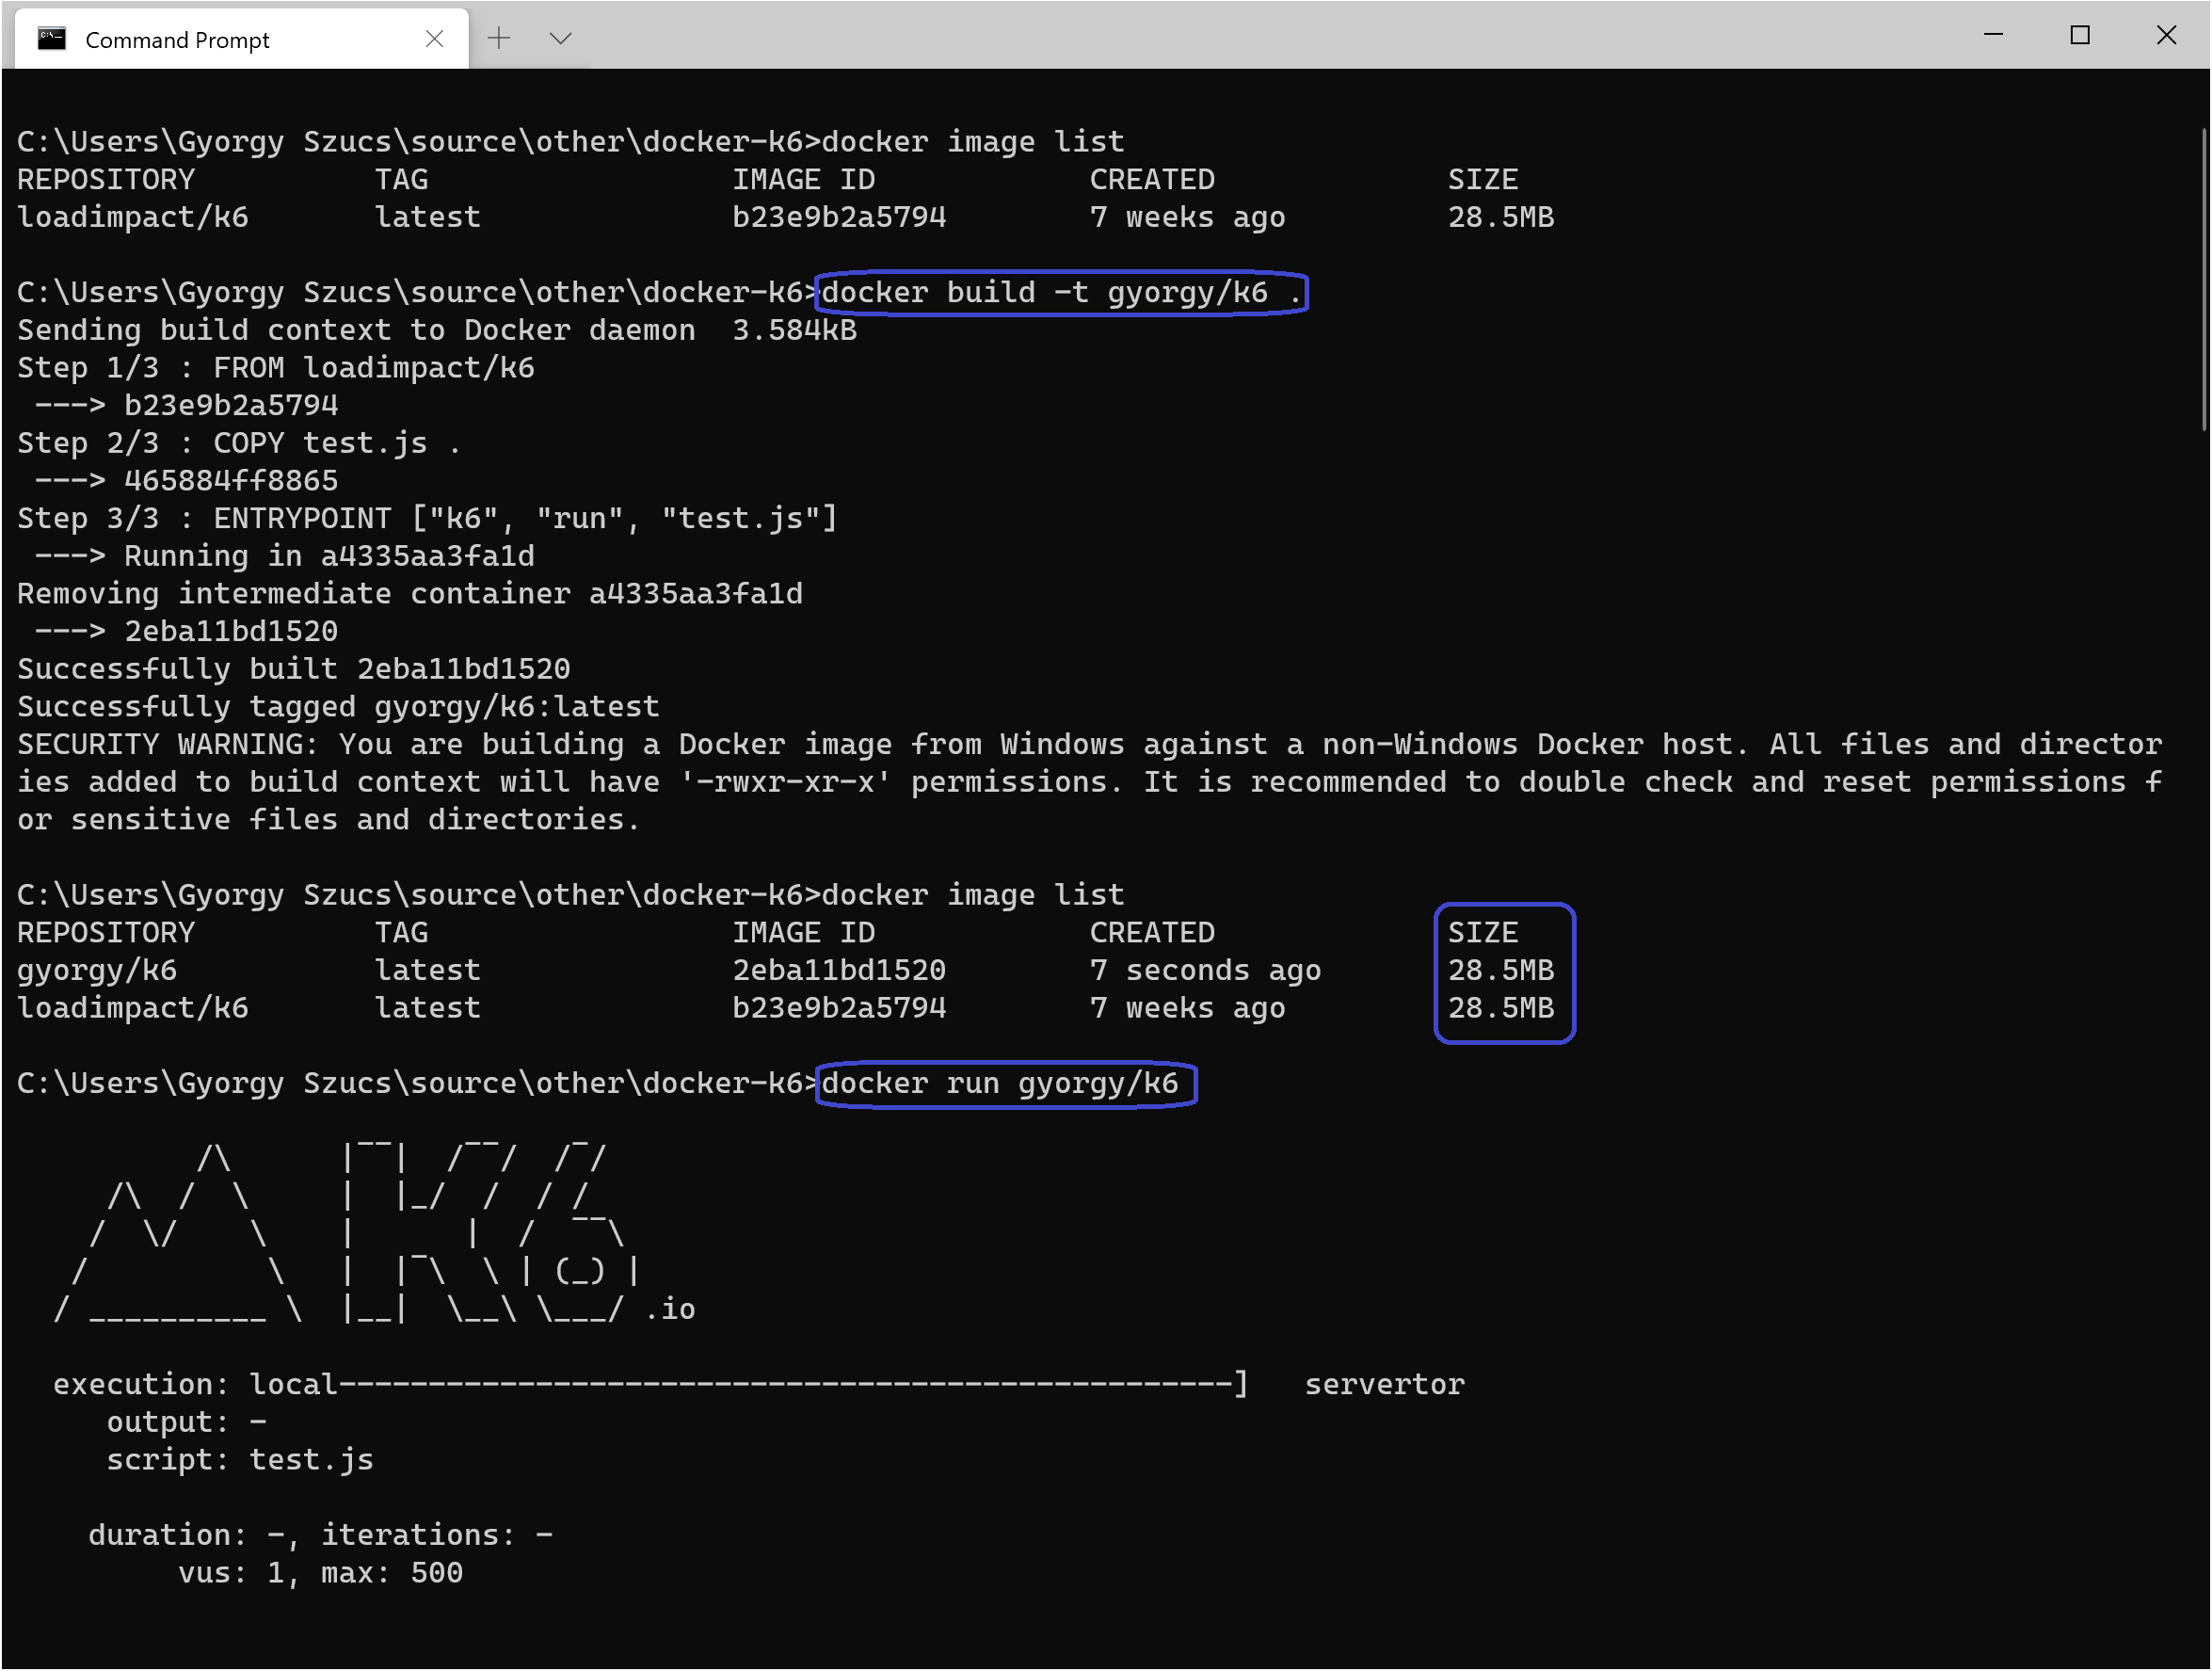
Building and Running our Custom Image
We can see that the image we’ve just built is the same size as the original loadimpact/k6 image (28.5Mb) since ours is really just the extra test file (less than 1k). After running it, we can see our test’s output now.
Pushing custom images
The image we built in the previous section are only available on our local machine. We need to push it either to a private Docker Hub repo or to Azure Container Registry for it to be available for the Container Instances. Let’s try and do it on Azure:
- Navigate to Azure portal, create a new Resource Group for testing
- Add a new Container Registry resource:
- On the Basics tab, make sure the following parameters are set:
- SKU: Basic ⚠️ it’s more than enough for now, and costs a lot less ⚠️
- Click on Review + create then Create
- After it’s been created, go to the resource: under Settings > Access keys > Enable Admin user
- On the Basics tab, make sure the following parameters are set:
- Connect to the ACR (Azure Container Registry) in the command line:
az loginto log in to our Azure subscriptionaz acr login --name <ACR NAME>to connect to the ACR
Alternatively you can do docker login <ACR NAME>.azurecr.io and user the username/password for the admin user you set up for the ACR in the Azure portal. Same applies if you don’t do az login before the az acr login, you’ll need these credentials. With az login, it’s all taken care of for you. Enabling the admin user is necessary later when the ACI pulls the image from the registry.
Admin user alternative
Unfortunately we cannot use Managed Identity to pull an image from ACR during the Container Instance creation ( see docs ), so enabling the admin account is the only option to make things work, but we will never really need to use or set the password anywhere.
We are almost ready to push our custom image - we need to make sure the image is tagged correctly. Originally we created a gyorgy/k6 image but we cannot push that into gyorgytest.azurecr.io, let’s re-tag the image then push it.
|
|
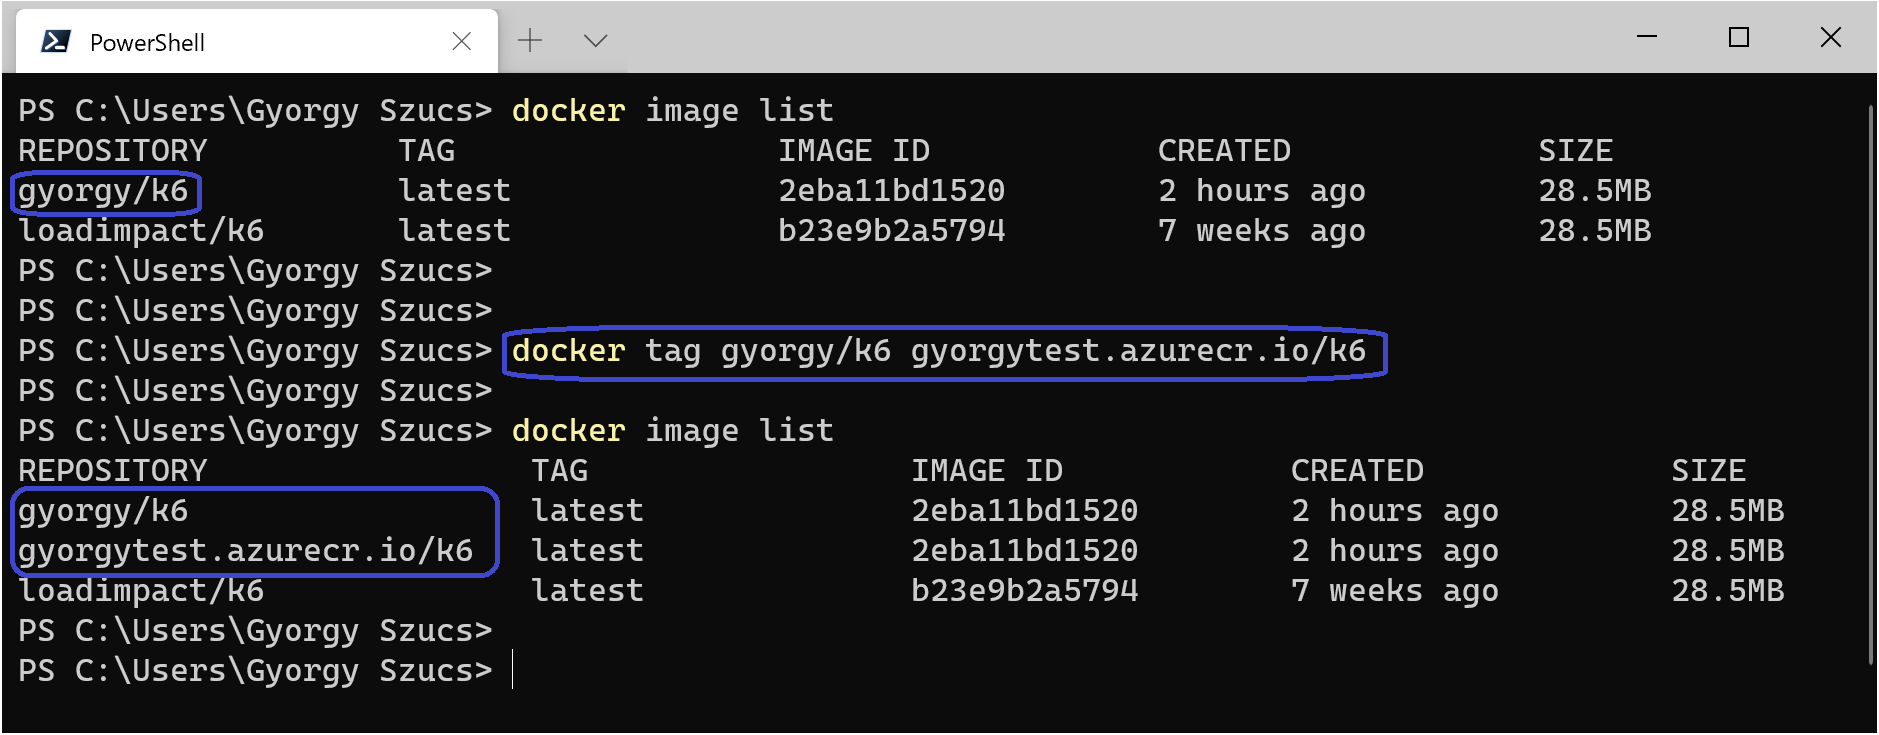
Getting our Image ACR Ready
ACR image in ACI - what?
Now that everything is in place, and we have pushed our Docker image to ACR, we are ready to use it as our Container Instances’ image.
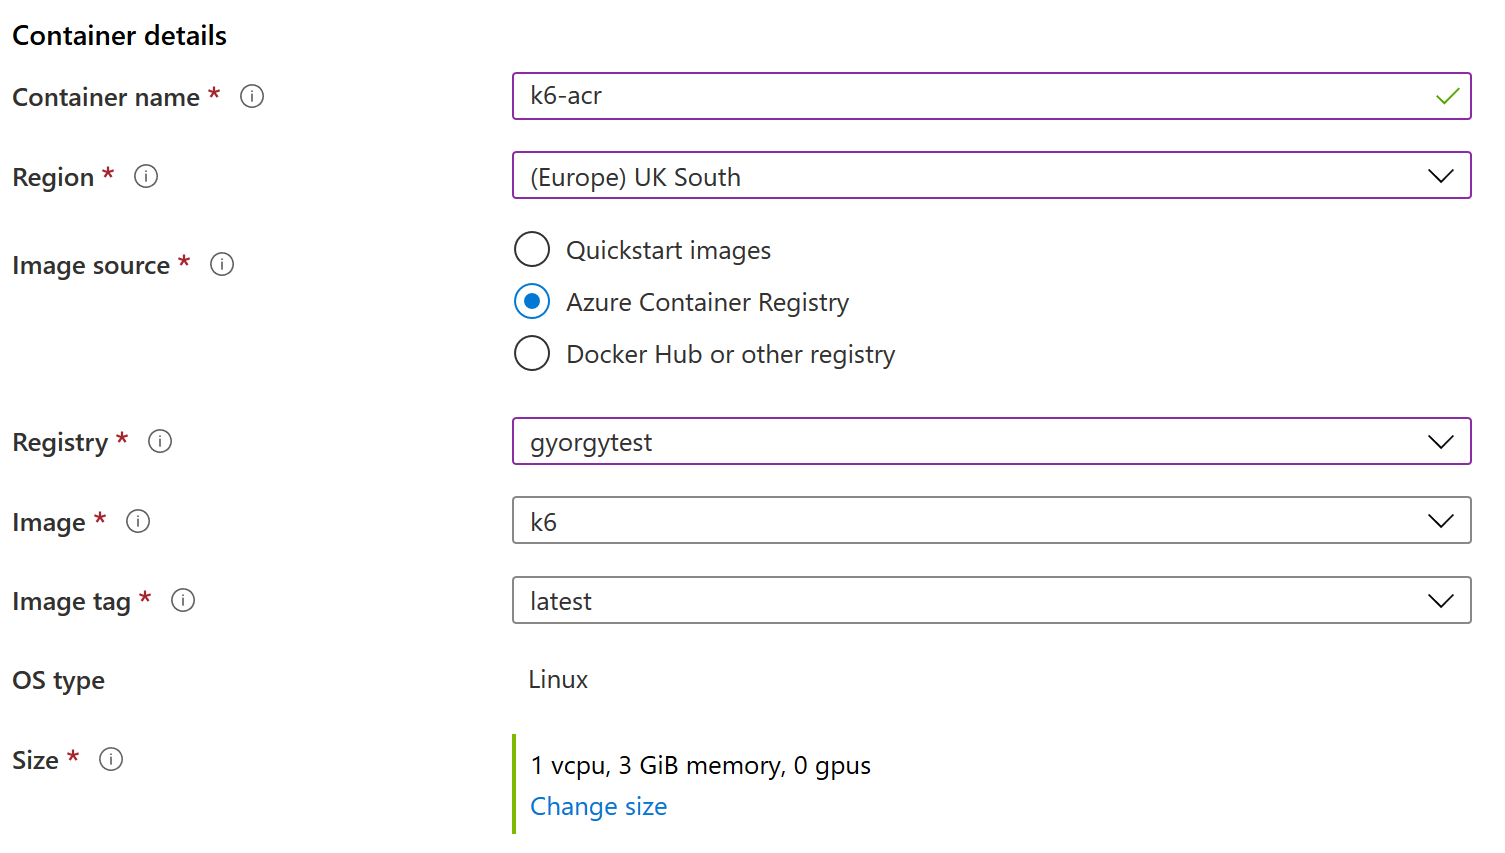
We have deployed Azure Container Instances before, but now we are connecting to a private container registry (our ACR) to pull the image that runs on the ACI, so we need to make slight modifications to the deployment process:
- Navigate to Azure portal, create a new Resource Group for testing
- Add a new Container Instances resource:
- On the Basics tab, make sure the following parameters are set:
- Image source: Azure Container Registry
- Registry: <ACR Name>
- Image: k6
- Image tag: latest
- OS type: Linux
- Size: 1 vcpu, 3 GiB memory, 0 gpus
- On the Advanced tab, set these values:
- Restart policy: Never
- Click on Review + create then Create
- On the Basics tab, make sure the following parameters are set:
As you can see, there’s no need for a command override like before, as our image defines the ENTRYPOINT for the container, which is basically running k6 with our test.js file.
As before, after clicking Create the ACI gets created and automatically started up: it pulls the image from ACR this time, then starts up a container which does its job (the load test) and exits.
ACI Setup on Azure for Custom k6 Test - Image from ACR
Limitations of the current approach
Whenever we change our testing code, we will need to rebuild the image, as the test file is packaged into it. This new image then needs to be pushed to the ACR. Also because of the fact that the test script itself is embedded into the image, it is only usable for a single project.
Some good news
Container Instances are always pulling the version of the image that we specify during the resource creation, and since we didn’t tag our image with specific versions and just used latest, this approach might be good enough for your use case.
Conclusion
We’ve just seen a couple of ways to run our custom load tests on Azure using the k6 tool:
- using a public test file, or
- creating a Docker image bundled together with a test file.
One of these solutions might fit for purpose for your needs, and you can start experimenting with running k6 on Azure Container Instances for your project.
If Docker was all new to you or just want a refresher, I highly recommend this great intro to Docker by Aaron Powell from the NDC Conferences.
We also got closer to our final solution, so I hope you feel adventurous and come back to check out how to make reusable Docker images where we can target multiple products with their own testing code. We are going to dive deeper into Docker images and scripting.
Stay tuned!